Easy Way to Add Lattice to Quilt Blocks
I'm excited today because I've got a favorite baby quilt tutorial, perfect for 5″ charm squares and showing-off cute fabric. It's also a skill-builder quilt, so if you're a new quilter, this will help you build your skills for piecing a quilt on the diagonal. If you are brand-new to quilting, I highly recommend you check out my Beginning Quilting series for all the basics on supplies, cutting fabric, piecing, and quilting!

Second, since this quilt is so perfect for showing-off beautiful fabric prints and colors, I'm using Lindsay Wilkes' first fabric collection, Dainty Darling for Riley Blake Fabrics. (Post update – these prints are now mostly out of print but you may still be able to find some online on Etsy. Or Google Dainty Darling Riley Blake.)

These cheerful, vintage-inspired prints are so pretty – I was really excited to create something fun with them.

This lattice baby quilt is inspired by one of my most popular patterns – my large Lattice Quilt. It's such a great one for showing-off lots of busy prints because the sashing breaks them up and lets each one pop. Many people over the years have asked for a baby version of that lattice quilt pattern, but the scale of those blocks is too large for a small quilt. So I've reduced the scale of the blocks – making it Charm Square (5″ x 5″) friendly. I wrote this lattice baby quilt pattern quite a while ago, but decided it was time for an update.

Lattice Baby Quilt Tutorial
If you would prefer Printable PDF version of this lattice baby quilt pattern you can find one available here for $2.00.
This quilt finishes at 41″ x 49″

Fabric Requirements for your Lattice Baby Quilt Tutorial:
50 5″ x 5″ print squares
1 ¼ yards sashing fabric
2½ yards backing fabric
⅜ yard binding
Cutting for your Lattice Baby Quilt Tutorial:
From (white) Sashing Fabric cut:
2 strips 5″ x wof (width of fabric)
1 strip 7 ¾" x wof
10 strips 1 ½" x wof – these will be pieced together for long sashing strips
5 strips 2″ x wof for borders
From Binding Fabric cut:
5 strips 2 ½" x wof (or 190″ of continuous bias binding)

From one of the 5″ x wof strips, cut 2 squares 4 ¼″ x 4 ¼″ . Cut each square once on the diagonal. You will have 4corner-setting triangles.
From remaining 5″ strips cut 40 pieces 1½" x 5″.
Subcut 7 ¾" strip into 5 squares 7 ¾" x 7 ¾". Cut squares twice – once on each diagonal to get 4 triangles per square, for a total of 20 triangles (you will only need 18) – reserve for side setting triangles.
(Post update: side setting squares were originally 7 ½″ x 7 ½″ – I've made the decision to make them bigger so that points of squares don't get cut off when squaring off sides before adding final border.)
Assembling your Lattice Baby Quilt
Remember, all seam allowances are ¼″ for piecing quilts. (If you are looking for a step by step guide to making quilts, check out this series of Beginning Quilting tutorials.)
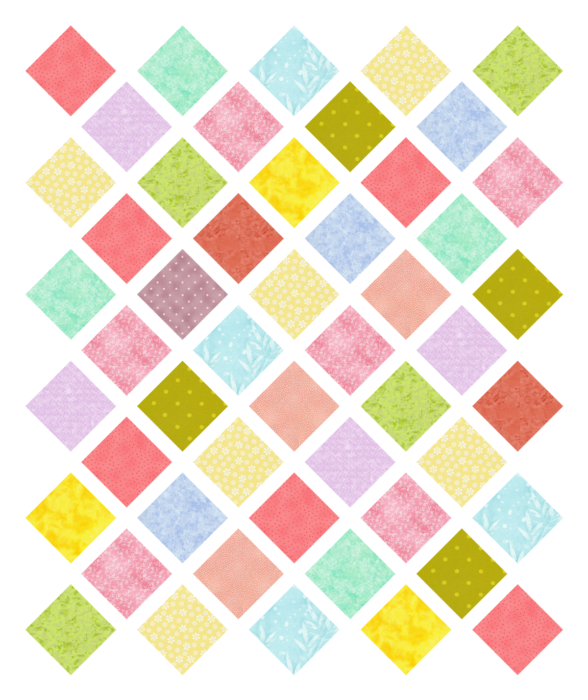
Using the 50 5″ x 5″ squares, layout the squares on point starting with 5 squares across and 6 squares down (use diagram as guide) until you get a design and balance of colors and prints that you like.
Because the blocks in this lattice baby quilt are laid out "on point", we will sew the rows together in diagonal lines. This requires a slightly different way of thinking about how your rows come together, but it's not scary. Piecing quilt blocks on point can give your quit a dynamic look. So let's see how it works!

Start assembling rows diagonally with a side-setting triangle at the beginning and end of each row. Row 1 will have only 1 square between the side-setting triangles and a corner-setting triangle at the top. (See photo above for layout.) Press seams toward the print squares.
Rows 2-9 will have a 5″ x 1½" sashing strip between the squares.
Sew a corner-setting triangle at the end of row 5 and at the beginning of row 6.

Side Setting Triangles: Sew the right (90 degree) angle to the end of your row. Frequently asked question: The edge of my triangle is longer than the 5″ x 5″ square – where do I match it up? Answer: line up the bottom edge of the triangle with the bottom edge of your square. The top tip of the triangle will protrude past the top edge of the square. You will square this off later.
Notice that that triangles rotate directions depending on where they lie on your specific row.
Corner Setting Triangles: center the long edge of these four triangles and sew to the end of the square in the four corners. We will square-off the edges off later.

Once all 10 rows are pieced, take the 10 1½" x wof sashing strips and trim or sew strips together to get a generous length to sew in between the pieced rows. Begin to assemble pieced rows with a sashing strip in between. Leave about 2″ of strip at the end of each row. (Again, we will square-off the sides after all the rows are pieced.)

Here's another visual where you can see how the rows are staggered when sewing them together to get the "on point" version of patchwork.

When sewing the rows together, in order to make sure the side-sashing strips match up (and to help keep the quilt 'square'), place the row with the long-sashing strip sewn to it on the bottom with the row to be attached right-sides together. Fold back the top row and make sure the seams of the sashing segments are lined up.
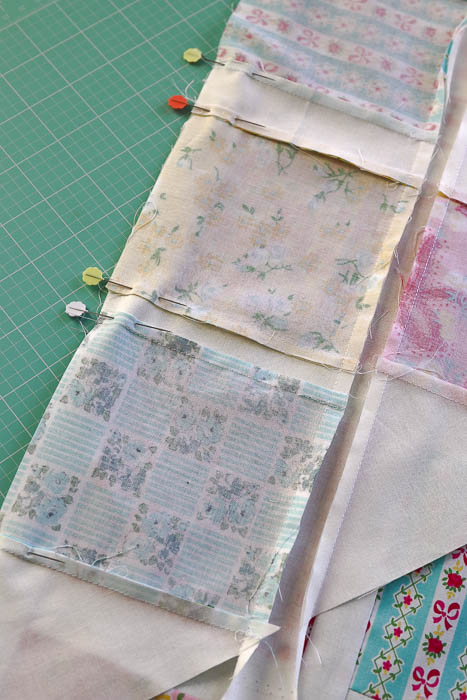
Carefully fold the top row back so that they are right-sides together and pin the two rows together to hold them in the correct place for sewing.

Once all of the rows are pieced together, press seams toward the sashing strips. Square-off corner-setting triangles using the quilt's sides as your guide.

Use the lines on your ruler to keep the corners square. (See 10″ line in this picture.)
Lattice Baby Quilt Borders:
It's easy for quilts pieced together in diagonal rows to get a little wonky. Adding the final borders will help keep you quilt 'square' and not have wavy edges. This is my favorite method for adding borders.
(You will need to piece borders for the long sides.)

Trim the selvage edges off your 2″ x wof border strips. Stack 2 strips on top of each other and line them up down the center of the quilt. Use a pin to measure the edge of the quilt. Trim with a rotary cutter.

Fold border strip in half and mark with a crease. Carefully pin borders to the edges of the quilt, starting by matching up the center of the border strip with the center of the strip, and then at the two ends.
Carefully pin the border strip to the edges of the quilt, evenly spacing the pins.
Sew strips in place. Press seams to the outside border. Repeat with remaining sides of the quilt. (See this Quilt Borders 101 post for more photos and process details, if needed.)

Quilt using your favorite method (or quilter.) My friend Melissa of Sew Shabby Quilting quilted this one for me.

Binding your Lattice Baby Quilt:
Sew 5 binding strips together end to end. I use this binding method for finishing this quilt.


And there you have it! The step-by-step process for a simple lattice baby quilt, that is perfect for using up charm-squares or showing off your favorite fabrics.

 If you don't have the need for a baby quilt in the immediate future, pin this image to save it for future reference. Hopefully it's also a good reference for sewing a quilt together on point.

A Printable PDF version of this lattice baby quilt pattern is available here for $2.00.
Frequently Asked Question: Is this lattice baby quilt available in a Twin (or other size)?
Answer: At this time, no. I haven't had the time to resize and construct a larger version of this quilt. But I do have a larger version of a similar Lattice Quilt pattern available here. And, honestly, I'd rather make a larger quilt with larger-scale blocks in that pattern as I will come together much faster and easier.
Source: https://www.diaryofaquilter.com/lattice-baby-quilt-tutorial/
0 Response to "Easy Way to Add Lattice to Quilt Blocks"
Post a Comment